

This article is meant for beginners. The focus of this blog is to get you started with Git & GitHub. Let's get started!
PermalinkWhat is GIT?
According to the official website of git, its definition is:
Git is a free and open-source distributed version control system designed to handle everything from small to very large projects with speed and efficiency.
Now, what does this even mean? I didn't get it. Okay, Let's break this definition and try to understand it in the easiest way possible.
First, let's understand what version control is.
Version Control is the process of managing different versions of your code and keeping track of changes made to any version of your project. Normally version control in your local computer may look like this:
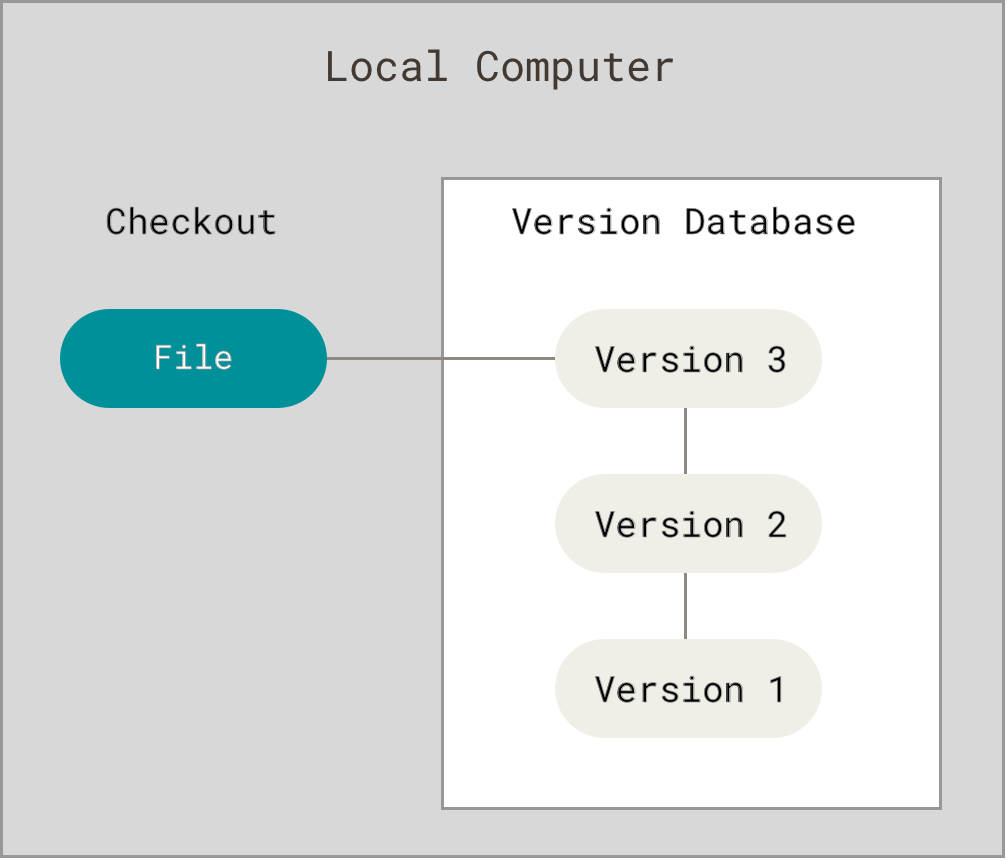
Here we store different versions of a file locally on our computer and keep track of changes made in these different versions. Now, this method of keeping track of your project is good for small projects, but what if you have a project that is already large enough, you won't be able to keep every version of your project on your local machine.
Here comes GitHub for rescue.
GitHub is a code hosting platform for version control and collaboration.

PermalinkGit & GitHub Basics
PermalinkSetting Up Git
Configure username
git config --global user.name your_username_here
Configure email address
git config --global user.email your_email_address_here
To check your current username and email configuration
git config user.name
git config user.email
If you wish to not expose your email address when you commit on GitHub, a noreply email address can be used for this purpose. Visit github.com/settings/emails and check the Keep my email addresses private option, now from here you can use the noreply email directly if you are using through the website or if you are using the command line git tool, you can easily set your noreply email using the config command above.
PermalinkWorking of Git
➤ Modified (files that have been modified/changed)
➤ Staged (files that have been added to staging are files that we want to commit)
➤ Commit (files that are in staging are committed when we make a commit)
PermalinkSome Useful Git Commands
- Initialize a repository inside any folder and push content it to GitHub
- git init
- git commit -m "commit message here"
- git remote add origin https://github.com/user_name/remote_repository_name.git
- git push -u origin main
NOTE: We can initialize any folder as a git repository, the folder can either be empty or may already have some files.
- See which files have been modified
git stages
- Add modified files to the staging
git add name_of_modified_file
- Remove any file from the staging area
git rm --cached path_to_file_you_want_to_remove
- Add all the modified files to the staging area at once
git add .
- Make a commit
git commit -m "descriptive_message_here"

- See all your commits
git log
- See all commits in single lines
git log --oneline
- See the state of code in a commit ( Checkout commit )
git checkout commit_id_here
To get back to the current state of the code we can use
git checkout main
This will take us back to our present code
- Revert a commit
git revert commit_id_here
- Reset Commit
git reset commit_id --hard
- Git Push The git push command pushes your code to GitHub and you can now see your updated code on GitHub.
git push origin branch_name_here
NOTE: The default branch name is main, so if you intend to push your code to main branch, specify it in the above command
PermalinkGit Branches
We can create multiple branches for our code that are isolated from the main branch to implement and test new features separately without breaking our original code and later merge these branches if we want to.
- Create a new branch
git branch branch_name
- See all the available branches
git branch -a
- Checkout(Change) branch
git checkout branch_name
- To switch back to the main branch we can simply use
git checkout main
- Delete a branch
git branch -D branch_name
NOTE: -d flag in the above command would only work if the branch has been merged with the main branch, else we have to use the -D flag to delete the branch
- Create a new branch and checkout using a single command
git checkout -b branch_name
PermalinkMerging Branches
To merge branches we have to be on the branch in which we want to merge another branch
PermalinkMerge branches
To merge v1 branch into main the branch we will use the following command
git merge v1
Thank you for reading this article, I hope you find this helpful. I still feel like there's more to add to this article so I'll be updating this from time to time, if you feel like I've made any mistake in the blog or want to give your feedback, feel free to shoot me a message over twitter.
Happy learning until next time 🫡